Monday, February 27, 2017

How To make Field Editable on condition in MS Dynamics NAV 2016?


How To make and Field Editable on Boolean Condition?


In this blog post I am going to define and do an requiremnet for my client who needs to restrict the Field on boolean condition in Microsoft dynamics NAV 2017.

How to make afield editable in MS Dynamcs NAV 2016


Applying conditions :-


How to make afield editable in MS Dynamcs NAV 2016


basically these are the conditions which are used according to the requirement.
This is the Editable property on which you can set up the boolean field and it will only be editable when a user checks the Boolean field and tries to edit or enter something. Once you again untick the boolean field 
it will refreshes the field value.

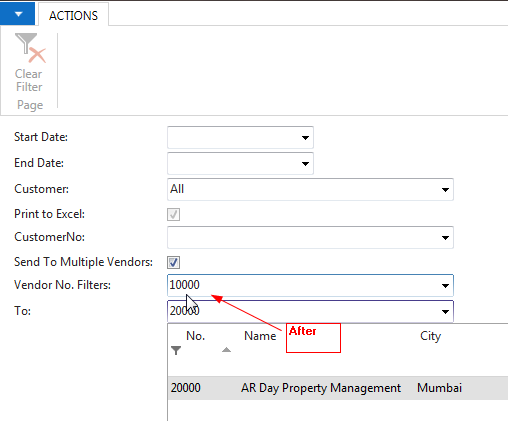
To check you can refer these screen.


How to make afield editable in MS Dynamcs NAV 2016

How to make afield editable in MS Dynamcs NAV 2016


You can also refer to MSDN website here :-


I hope I had Explained the steps clearly if you like the post and it helped you then please share our post and subscribe to our blog post.

Thanks.

How to make afield editable in MS Dynamcs NAV 2016


How To save excel File in MS Dynamics NAV From Excel Buffer? Anand Blog


How To save excel File from Excel Buffer in Dynamics NAV 2016?


This article is about the steps required to save an excel which was generated from Excel Buffer in Microsoft Dynamics NAV 2016.

Step 1 . 

In this article I am taking my preferred Location To Save the Excel File the location is at a Setup table.So you have to create some new functions in your excel Buffer Table. Please see the reference screen.

How to save excel buffer in navision 2017?

Copy Paste the Standard Function :- 

Named CreatebookandOpenexcel and create a new Function SaveExcel
You can also copy paste the code

CreateBookAndSaveExcel(FileName : Text;SheetName : Text[250];ReportHeader : Text;CompanyName2 : Text;UserID2 : Text)
CreateBook(FileName,SheetName);
WriteSheet(ReportHeader,CompanyName2,UserID2);
CloseBook;
Saveexcelby;

Friday, February 24, 2017

THREE Fundamental Rules not to Ignore XMLport Properties.

Use of XMLPORT :-

An XML document is a well-structured hierarchy of nodes which at the same time contain the data, and also describe the nature of the data in the document.

What is XMLPORT?

Designing an XMLport is actually designing the structure of the external file, whether it is an XML document or a text file. This primarily involves setting various properties in the XMLport objects, such as XMLport properties and Node properties.

Working of XMLPORT :-

When an XMLport is used to import data, records that are read from the external file are inserted into the table that corresponds to the table node in the XMLport. You can examine the records before inserting them, specify whether records are inserted automatically, and decide whether records already in the database are overwritten or updated when a record with the same primary key is read from the external file. You can also determine to completely skip records from import.

Important Properties in NAV Xmlport

all Xmlport Properties


Node Properties for Import
When Node Type is set to Table, there are three more properties that specify the behavior of the XMLport during import operations: AutoSave, AutoUpdate, and AutoReplace.

AutoSave :- Specifies whether imported records are automatically written to the table.

AutoUpdate :- Specifies whether a record in the database that has the same primary key as a record in the import file is updated with values from the imported record.Values of database fields that are not present in the import file will not be modified by the XMLport.

AutoReplace :- Sets whether imported records automatically replace existing records with the same primary key.Values of database fields that are not present in the import file will be reset to their initial value,according to their InitValue property.

XMLPORT Properties

For More Information :-

Friday, February 17, 2017

How TO use Outlook for mail in MS Dynamics NAV 2017?


Requirement :-
While using MS Dynamics NAV mail functionality sometimes a user wants to see the sent items in his Sent mail Box.
Procedure: 
You need to define the SMTP mail Setup table with your Outlook Config. By default the  Setup Values are :-


MS Dynamics NAV SMTP Setup


Step1.
Design a codeunit for the functionality or you can put the same on page also. Define a record Type variable of ID 397 For Outlook. (FOR SMTP it is 400).

Step2.
Now Just Use this code.

OutlookMail.NewMessage('ToEmail','CCEmail','BCC Email',
'ITS A TEST MAIl From NAV PLease Donot Reply','GOOD Luck','',FALSE);
OutlookMail.Send();
MESSAGE('Mail Sent');
For reference You can check.


Step3.
Now run the report your mail must be sent.

Hope you learnt it well, If you like it the please share and subscribe with our blog using email subscription so that you get the latest update of our blog on the same day.


How to create user and open RTC Client Of MS Dynamics NAV 2016 and above?


---------------------------
You do not have access to Microsoft Dynamics NAV. Verify that you have been set up as a valid user in Microsoft Dynamics NAV.
---------------------------
OK   
---------------------------


Requirement :-
 This Error occurs when we install a new Database in SQL and after creating the instance we are going to run RTC from Development Environment.

Cause:-
New database does not contains the Windows Login ID through which we are connecting.

Solution :

Step1.
To resolve this error , Open SQL Server Management Studio SSMS from Start and in your Login assign the USER MAPPING for database. For reference you may check it.


Step2.
Now if your DB is new installed then you need to Run This Querry. It will Delete old user and their data.

DELETE FROM [dbo].[User];
DELETE FROM [dbo].[Access Control];
delete From [dbo].[User Property];
delete FROM [dbo].[Page Data Personalization];
Delete FROM [dbo].[User Default Style Sheet];
Delete FROM [dbo].[User Metadata];
DELETE FROM [dbo].[User Personalization];

Step3.
Now Run this Querry to create Your USERID in User table and other Table. 

SET NOCOUNT ON
GO
USE [DATABASE NAME -- NAV 2013 database you want to use
GO
DECLARE @UserID varchar(100)
SET @UserID = 'domain\Username'  -- Windows Login you want to add
-- Get security identifier (SID) for specified user.  Login must be setup in SQL Server first.
DECLARE @BinarySID binary(100)
SELECT @BinarySID = sid FROM sys.syslogins WHERE name = @UserID
IF @BinarySID IS NULL
  RAISERROR('SQL Server login not found for User %s.', 10, 1, @UserID)
-- SID is stored in the User table as a formatted string.  Need to convert it.
DECLARE @StringSID varchar(238)
DECLARE @i AS int
DECLARE @j AS int
DECLARE @Grp AS int
SELECT @StringSID = 'S-'
    + CONVERT(VARCHAR, CONVERT(INT, CONVERT(VARBINARY, SUBSTRING(@BinarySID, 1, 1))))
SELECT @StringSID = @StringSID + '-'
    + CONVERT(VARCHAR, CONVERT(INT, CONVERT(VARBINARY, SUBSTRING(@BinarySID, 3, 6))))
SET @j = 9
SET @i = LEN(@BinarySID)
SET @Grp = 1
WHILE (@j < @i) AND (@Grp <= 5) BEGIN
  SET @Grp = @Grp + 1
  DECLARE @val BINARY(4)
  SELECT @val = SUBSTRING(@BinarySID, @j, 4)
  SELECT @StringSID = @StringSID + '-'
    + CONVERT(VARCHAR, CONVERT(BIGINT, CONVERT(VARBINARY, REVERSE(CONVERT(VARBINARY, @val)))))
  SET @j = @j +
END
-- Check to see if User record already exists
DECLARE @UserGUID uniqueidentifier
SELECT @UserGUID = [User Security ID]
FROM [User] WHERE [Windows Security ID] = @StringSID
IF @UserGUID IS NOT NULL
  PRINT 'User ID ' + @UserID + ' already exists in User table.'
ELSE BEGIN
  -- Generate new GUID for NAV security ID
  SET @UserGUID = NEWID()
  -- Create User record
  INSERT INTO [User]
  ([User Security ID], [User Name], [Full Name], [State], [Expiry Date], [Windows Security ID], [Change Password],[License Type],[Authentication Email],[Contact Email])
  VALUES(@UserGUID, @UserID, '', 0, '1/1/1753', @StringSID, 0, 0 ,'VE00AC832@yamaha-motor-india.com','') 
  PRINT 'Created User record for User ID ' + @UserID + '. - ' + CAST(@@ROWCOUNT AS varchar) + ' row(s) affected.'
END
-- Check to see if user is assigned to SUPER role 
IF EXISTS(SELECT * FROM [Access Control] WHERE [User Security ID] = @UserGUID AND [Role ID] = 'SUPER' AND [Company Name] = '')
  PRINT 'User ID ' + @UserID + ' is already assigned to SUPER role.'
ELSE BEGIN 
  -- Create Access Control record to add user to SUPER role
  INSERT INTO [Access Control]
  ([User Security ID], [Role ID], [Company Name],[App ID],[Scope])
  VALUES(@UserGUID, 'SUPER', '','2de23703-bbb9-4542-970d-84b6e5597f53','0')
  PRINT 'Added User ID ' + @UserID + ' to SUPER role. - ' + CAST(@@ROWCOUNT AS varchar) + ' row(s) affected.'
END
-- User Property record required to allow login
IF EXISTS(SELECT * FROM [User Property] WHERE [User Security ID] = @UserGUID)
  PRINT 'User Property record already exists for User ID ' + @UserID + '.'
ELSE BEGIN
  INSERT INTO [User Property]
  ([User Security ID], [Password], [Name Identifier], [Authentication Key], [WebServices Key], [WebServices Key Expiry Date],[Authentication Object ID])
  VALUES(@UserGUID, '', '', '', '', '1/1/1753','')
  PRINT 'Created User Property record for User ID ' + @UserID + '. - ' +  CAST(@@ROWCOUNT AS varchar) + ' row(s) affected.'
END
SET NOCOUNT OFF
GO

Step4.


Now run the RTC Client From Dev Environment. You can also Download both the Querry From below mentioned link.


Link 1 Delete Querry :- 


Hope you enjoyed my Post and this solution helped. If you Liked it then please do share and comment below your new requirement and errors , We will revert you back soon.